Frequently Asked Questions
The FAQ section is work in progress.
You can search with your browser on this page or search through all entries on GitHub.
 Guides
- How can I add my Discord ID to my Portmaster Account?
- How can I allow a blocked connection?
- How can I allow incoming connections?
- How can I help testing Portmaster?
- How do I share debug information and logs?
- Where can I find more information on domains and IPs I see?
Privacy Filter
- Default Settings for Incoming Connections CHANGED in v0.9.6
- How can I allow a blocked connection?
- How can I allow incoming connections?
- Should I use an Anti-Virus together with Portmaster?
- Why does Portmaster keep blocking connections after I close it?
SPN
- Can community nodes see my traffic?
- How can I enable or disable the SPN for just one application?
- How can I exclude a Domain or IP address from the SPN?
- How can I exclude the Local Network (LAN) from the SPN?
- How can I host a community node?
- Why does the SPN not connect?
Starting and Stopping
- Does Portmaster protect on startup?
- Portmaster Core Does Not Start at Boot
- Portmaster Fails to Restart
- What changes does Portmaster make to my system?
- Why is my Internet or Network Access broken after shutdown or uninstall?
Compatibility
- Can I run Portmaster on a server?
- Does Portmaster support IPv6?
- How do I make my VPN or other software compatible with Portmaster?
- Should I use an Anti-Virus together with Portmaster?
- Where is the tray icon / app indicator in GNOME?
- Why don’t I see any notifications / prompts in my OS?
Leaks
- Why does Portmaster send plain/unencrypted DNS queries?
- Why does the DNS Leak test say that I have a leak?
Windows
- How can I uninstall Portmaster?
- Notifications not available on Windows 7 and 8
- Portmaster Core Does Not Start at Boot
- Portmaster Fails to Restart
- Why is my Internet or Network Access broken after shutdown or uninstall?
Linux
- How can I uninstall Portmaster?
- Why is my Internet or Network Access broken after shutdown or uninstall?
Other
How can I add my Discord ID to my Portmaster Account?
You can link your Discord ID to your Portmaster account in order to gain access to private channels as well as gaining the sweet user flair on all your posts:

Get your Discord ID
Your discord ID is NOT your user name, and most people have never seen it.
We might update the bot in the future to retrieve this ID automatically, but for now you will have to jump through some hoops to get your ID.
1. Go to settings
 2. Open Advanced
 3. Activate “Developer Mode”
 4. “Copy ID” from your “My Account” Page

Add your ID to your Portmaster Account
After logging into your Portmaster Account at https://account.safing.io/:
1. Go to “Account and Password
 2. Enter your Discord ID
 3. Confirm Change with Password

The update in Discord should be immediate. Note that Reddit can be filled out already but this feature is not available yet.
How can I allow a blocked connection?
Portmaster is all about protecting your privacy. This also means that it may block something that you want to allow. Here’s how you do it:
1. Find the blocked connection in the Network Monitor
Before we can try to fix anything, we need to find the connection that is blocked in the Network Monitor. To do this, open the Portmaster App, which will start with the Network Monitor already open.
Then, find the application that you are having trouble with. Sometimes applications are split into multiple sub-parts, so you might need to click around. If you see an application that has at least a little bit of a grey bar, it means that at least one connection is blocked:

If you have found the application, open it and search for the blocked connection, which are marked with a red dot:

If your connections are grouped in some way, again look out for the grey parts of the bar:
If you found a connection that was blocked and looks like the one that you’d rather allow, continue to the next step:
2. Find out why it is blocked
To get more information about the blocked connection, click on it to open the details:

In addition to many other details (also depending on your User Interface Mode), you can see “Applied Setting” in the bottom left of this section. This tells you which setting was responsible for blocking this connection.
3. Allow the connection
In order to allow this connection, you now have two options:
- Add an exception for this connection (recommended), or
- Change the responsible setting
3.1. Add an exception for this connection
In order to add an exception for this domain, just press the button at the bottom left of the connection section:

If you then go to the settings of the application, you will see that a new rule was added:
If the “Allow Domain” or “Allow IP” button is disabled, this means that an exception is not possible and that you must change the responsible setting:
3.2. Change the responsible setting
Before you change the setting, you must decide whether you want to change the settings for this app only (recommended) or globally for all apps (which don’t have this setting configured differently).
Pressing the corresponding button will take you to the responsible setting:

How to change the setting heavily depends on the setting itself, so the best way to go forward is to read the description by clicking on the (i) icon:
Generally, we try to make all settings provide more protection by turning them “on”, so in most cases turning off a setting will allow the connection.
In case there are multiple settings that block a connection, you might need to repeat this process.
How can I allow incoming connections?
If you have an app your device that needs to accept or listen for incoming connections, you can easily allow it do so by disabling Force Block Incoming Connections within the app settings in Portmaster.

This will allow the app to accept connections coming from anywhere. If you would rather limit where this app may connect to and accept connections from, you can easily limit it using the settings Force Block LAN and Force Block Internet Access.

If you want even more control, you can use the Incoming Rules to very specifically allow who is allowed to connect. If you use rules, be sure to select “Block everything else” from the Quick Settings menu in order to block everything you did not specifically allow.

Note: You should never disable Force Block Incoming Connections in the global settings. This is potentially very dangerous.
How can I help testing Portmaster?
If you want to help testing Portmaster and want to give earlier feedback on new features, you can switch to the “Beta” Release Channel:
- Open Portmaster
- Go to the Global Settings
- Search for
releasein the search bar on top - Set the “Release Channel” setting to “Beta” in the dropdown menu
- Wait for the “Update Check Successful” notification
- Click “Restart” on the warning on the setting or use the power menu in the bottom left
- After Portmaster restarted, click the tools menu to check the current version and release channel
Please be sure to always report problems that arise, so we can quickly find and fix them! Also, general feedback on changes are always very welcome!
If you experience problems, you can always switch back to “Stable”.
How do I share debug information and logs?
First of all, thanks a lot for contributing! You’re probably reading this because you’ve been directed here and were asked to provide one of the following:
- Debug Info
- Logs
- (Debug Logs)
Debug Info
The debug information is a collection of helpful snippets of information that Portmaster produces itself. Often, you will be asked to collect this information while the reported issue is occurring. This is important, as the data is gathered live from the current state of Portmaster and will help us to see what the problem is.
If you’re experiencing a problem with a certain application, it can be very helpful to copy the application-specific version of the Debug Info. This is only (easily) possible using the “Application Page” method explained later.
We’ve taken care to include as little personal information as possible in the Debug Info. You can further reduce this information by restarting the Portmaster before copying the data - if you can reproduce the issue that way too.
You are of course also free to delete parts of the data before submitting - in that case please mark the areas you have deleted with [DELETED], so we know that information is missing.
There are multiple ways to acquire and share the Debug Info:
Tools Menu
Just click on the “Copy Debug Info” button in the tools menu in the bottom left. This copies the Debug Info to your clipboard. You can paste this directly into a Github Issue - it is automatically formatted using sections. It looks ugly in text format, but if you click on the “Preview” tab of your comment, you will see it nicely rendered.

It renders to something like this on GitHub:

Application Page
Find the affected application in the Portmaster App, then go to the “Details” tab and click on “Copy Debug Information” at the end of the page. This copies the Debug Info to your clipboard. You can paste this directly into a Github Issue - it is automatically formatted using section. It looks ugly in text format, but if you click on the “Preview” tab of your comment, you will see it nicely rendered.

Privately Via Ticket
Alternatively, you can submit the Debug Info privately via a support ticket. To do this:
- Open the Portmaster App
- Go to the Get Help page using the question mark button on the navigation bar on the left
- Then, click on “Report Bug”, and enter the following information:
- Title: “Debug Info for Issue”
- What Happend: Enter the Ticket ID or Github Issue URL.
- Then click on “Send Private Ticket” on the bottom of the page.
- You don’t need to provide an email.
- Notify the thread where you were asked to send the Debug Info that you’ve sent it.
Using cURL
If you’re a Linux user, you might want to get this data directly to your terminal. You can do this with the following command - and maybe pipe it to your clipboard to a file.
curl http://127.0.0.1:817/api/v1/debug/core
You can find the documentation of the API endpoints here:
Logs
Portmaster writes logs for all components. Logs are written in different levels to reduce sensitive information in logs and keep them in a manageable size. They are also automatically deleted after some time.
You may have been asked to change the Log Level before submitting the logs.
Please always provide the newest .log and .error.log files during which the reported issues occurred.
You can find the log files here:
Default Log File Locations:
- Windows
- Core Logs:
C:\ProgramData\Safing\Portmaster\logs\core - App Logs:
C:\ProgramData\Safing\Portmaster\logs\app - Notifier Logs:
C:\ProgramData\Safing\Portmaster\logs\notifier - Start Logs:
C:\ProgramData\Safing\Portmaster\logs\start
- Core Logs:
- Linux
- Core Logs:
/opt/safing/portmaster/logs/core - App Logs:
/opt/safing/portmaster/logs/app - Notifier Logs:
/opt/safing/portmaster/logs/notifier - Start Logs:
/opt/safing/portmaster/logs/start
- Core Logs:
We recommend that you upload these files to your favorite pastebin/privatebin or use our instance and add a 1-3 months expiration.
(Debug Logs)
In the past, “Debug Logs” has sometimes been used in conversations, but it does not clearly specify what is meant. If you are asked for this, please ask what exactly you should provide.
Where can I find more information on domains and IPs I see?
More about IPs
If you want to find out more about an IP you see, the first thing you can do is to increase the User Interface Mode to “Advanced”. This will show you more information about the IP address.
Every IP address is part of an “Autonomous System” or “AS”, which pretty much is just a organizational unit of the Internet. An AS always has a number and a name:

Please note that in most cases this is just the Hoster or “Cloud” that owns the IP address. Most often other companies “rent” these IP addresses. Nevertheless, this is an interesting information.
More about Domains
If you want to find out more about a domain, a good way to start is to check who owns the domain. You can do this with this tool: https://who.is/
You can also look up the domain on VirusTotal, an anti-virus “collective engine” run by Google: https://www.virustotal.com/gui/home/url
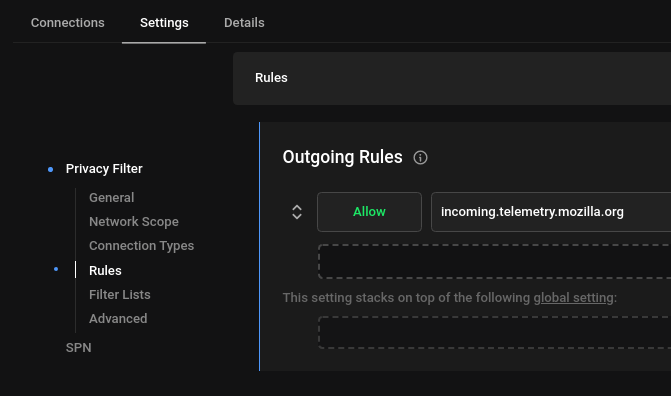
Default Settings for Incoming Connections CHANGED in v0.9.6
We have updated some default values for settings to make allowing incoming connections a lot easier:
The Incoming Rules now follow the Default Network Action (default: allow), making them work the same as Outgoing Rules. To still block incoming connections, Force Block Incoming Connections is now enabled globally by default. You can easily create exceptions in app settings to allow incoming connections! Please review your settings.
Previously, you had to add a rule to the Incoming Rules in order to allow incoming connections, but this is non-trivial, as you had to first understand how rules work and written. If you used rules in the past to allow incoming connections, these might now be blocked because of this change. In order to allow your incoming connections again, just head to the affected app and disable Force Block Incoming Connections and everything should work as before.
If that happens to you, please also review your existing Incoming Rules and possibly restrict them by selecting “Block everything else” from the “Quick Settings” dropdown at the setting. Alternatively, you can easily block the network scopes that your app does not need with Force Block Internet Access and Force Block LAN, which also apply to outgoing connections.
Portmaster will also warn you once a week if you have disabled Force Block Incoming Connections globally. So, just in case you configure Portmaster in a bad way, it will warn you about it.
How can I allow a blocked connection?
Portmaster is all about protecting your privacy. This also means that it may block something that you want to allow. Here’s how you do it:
1. Find the blocked connection in the Network Monitor
Before we can try to fix anything, we need to find the connection that is blocked in the Network Monitor. To do this, open the Portmaster App, which will start with the Network Monitor already open.
Then, find the application that you are having trouble with. Sometimes applications are split into multiple sub-parts, so you might need to click around. If you see an application that has at least a little bit of a grey bar, it means that at least one connection is blocked:
If you have found the application, open it and search for the blocked connection, which are marked with a red dot:
If your connections are grouped in some way, again look out for the grey parts of the bar:
If you found a connection that was blocked and looks like the one that you’d rather allow, continue to the next step:
2. Find out why it is blocked
To get more information about the blocked connection, click on it to open the details:
In addition to many other details (also depending on your User Interface Mode), you can see “Applied Setting” in the bottom left of this section. This tells you which setting was responsible for blocking this connection.
3. Allow the connection
In order to allow this connection, you now have two options:
- Add an exception for this connection (recommended), or
- Change the responsible setting
3.1. Add an exception for this connection
In order to add an exception for this domain, just press the button at the bottom left of the connection section:
If you then go to the settings of the application, you will see that a new rule was added:
If the “Allow Domain” or “Allow IP” button is disabled, this means that an exception is not possible and that you must change the responsible setting:
3.2. Change the responsible setting
Before you change the setting, you must decide whether you want to change the settings for this app only (recommended) or globally for all apps (which don’t have this setting configured differently).
Pressing the corresponding button will take you to the responsible setting:
How to change the setting heavily depends on the setting itself, so the best way to go forward is to read the description by clicking on the (i) icon:
Generally, we try to make all settings provide more protection by turning them “on”, so in most cases turning off a setting will allow the connection.
In case there are multiple settings that block a connection, you might need to repeat this process.
How can I allow incoming connections?
If you have an app your device that needs to accept or listen for incoming connections, you can easily allow it do so by disabling Force Block Incoming Connections within the app settings in Portmaster.
This will allow the app to accept connections coming from anywhere. If you would rather limit where this app may connect to and accept connections from, you can easily limit it using the settings Force Block LAN and Force Block Internet Access.
If you want even more control, you can use the Incoming Rules to very specifically allow who is allowed to connect. If you use rules, be sure to select “Block everything else” from the Quick Settings menu in order to block everything you did not specifically allow.
Note: You should never disable Force Block Incoming Connections in the global settings. This is potentially very dangerous.
Should I use an Anti-Virus together with Portmaster?
Speaking in general, Portmaster is a privacy tool, focusing on privacy features like DNS encryption or blocking tracking requests.
Anti-Virus systems, such as Windows Defender Firewall, on the other hand are security tools. As such, they focus on security features like malware detection, which Portmaster simply does not have.
Please note the important difference:
Anti-virus systems sometimes also _do privacy_, but they _focus on security_.
While Portmaster also _does security_, as privacy _depends_ on security, it _focuses on privacy_.
That is why we do not recommend deactivating Anti-Virus systems. We recommend having both have a security and privacy setup. Without security your perceived privacy can quickly become non-existent.
However, research if the Anti-Virus you are using is really as good as it claims. Many security researchers have come out in the recent years, declaring that Windows Defender Firewall is good enough for most use cases and quite some other Anti-Virus systems are doing weird stuff.
Why does Portmaster keep blocking connections after I close it?
Portmaster is not just one process, but consists of multiple parts:
- Portmaster Core Service: A system service started by your operating system.
- Portmaster Tray Notifier: A small icon living in your status and notification tray.
- Portmaster UI: The app you open.
If you close the app, you only close your “window” into what Portmaster (the Core Service) is currently doing. In order to fully shut down Portmaster and have it stop blocking anything, you must select the option in either the app or the tray:
UI - Settings Page:

Tray Icon:

When you close the app for the first time, it clarifies what is and is not happening when closing the app.
Read more about the architecture of Portmaster on our docs.
Can community nodes see my traffic?
Community Nodes are servers not hosted by Safing, but by the Portmaster and SPN community. Except for one aspect, community nodes are treated exactly the same as nodes operated by Safing.
The only difference is, that network connections that are not encrypted by themselves, like plain HTTP, will never exit the network at community nodes. Instead, they exit the network at specially trusted servers, which are a subset of the servers operated by Safing.
Community nodes will therefore never see any connection contents, as the connections are always encrypted for the destination server. This makes community nodes safe to use. Not only are they safe to use, but they are recommended, as they provide even better privacy due to more diverse server ownership in the nodes you use.
How can I enable or disable the SPN for just one application?
Applications can easily be excluded from the SPN by either using the quick setting in the app page header, or in the settings:

or

How can I exclude a Domain or IP address from the SPN?
You can easily exclude any Domain or IP address from the SPN by using the SPN Rules. It is a rule list similar to the others and applies the first entry that matches.

How can I exclude the Local Network (LAN) from the SPN?
The Local Network (LAN) is always excluded from the SPN, as servers in the SPN cannot access your local network.
VPNs do not differentiate between networks without special configuration.
How can I host a community node?
Have a look at this guide: Hosting a Community Node
Why does the SPN not connect?
When Portmaster connects to the SPN und normal circumstances, it does not depend on a single server or on DNS. It can directly try all servers to find one it can connect to.
If you are connecting to the SPN for the first time, Portmaster downloads a set of IPs from the update server in order to bootstrap into the network. After that, it only connects directly to the network.
Troubleshooting
Here are things you can try when Portmaster does not successfully connect to the SPN:
1. Check if your Internet connection works.
Disable SPN and check if you can connect to the Internet without the SPN.
2. Check for Portmaster Updates.
Sometimes there are changes to the SPN servers that also require Portmaster to update. We wait some time to allow clients to update before deploying breaking changes, but you might just be behind too much.

3. Re-Initialize
If none of these resulted in a successful connection to the SPN, you can also clear all caches regarding the SPN and re-initialize it.

4. Ask for Help
If none of these steps could resolve your issue, please reach out to use and we will investigate the issue. Be sure to open the Bug Report page in the Portmaster while it is trying to connect to the SPN, so that we have the correct data for analysis.
Does Portmaster protect on startup?
Portmaster is registered as a system service and starts immediately at boot - even before you log into your user account. This means that it generally starts before any other of your programs. Please note that the tray icon / app indicator is a separate process and is no indication for the Portmaster has started, as it is only started after login.
Besides that, there are some subtle differences depending your operating system:
Windows
The Windows system service of Portmaster is started as a regular service. The service then initialized the kernel driver / extension to integrate into the network stack. This means that Portmaster is currently started after the boot process of the Window Kernel is completed.
This means that, currently, some Windows services have a short head start before Portmaster. Tests on Windows 11 have shown these services to be able to communicate before Portmaster is ready:
- NetBIOS querying the network with a connection to
255.255.255.255 UDP/137. - Connectivity check with a connection to
www.msftconnecttest.com.
Future Improvement: After Portmaster has started for the first time, there will be an option to “persist” the Portmaster kernel driver, so that it is started with the kernel and blocks all connectivity until the Portmaster is fully ready. This is tricky as it can easily break your network connectivity or lead to a BSOD.
Linux
The systemd service of the Portmaster is configured to be started before the network and name resolution. This means that the protection is started before the network connectivity is enabled:
Before=nss-lookup.target network.target
Future Improvement: After we have implemented direct support for systemd, we will be able to use the WantedBy configuration option, which will make systemd properly wait until the Portmaster has fully started before continuing with other services, mitigating any possibility of race conditions.
Portmaster Core Does Not Start at Boot
Some users report that the Portmaster Core Service will not start at boot, although it is configured to do so. If that is the case, you can check its status in the “Services” Desktop App. There, search for the Service “Portmaster Core” and inspect and start it as needed.
Portmaster Fails to Restart
In some cases the Portmaster will fail to restart, because the Portmaster Kernel Extensions cannot be loaded and returns the error code 0x422.
This stems from a known issue in Windows, where system services are not completely removed when something is monitoring the system services.
When the Portmaster restarts, it is then unable to initialize the Kernel Extension, because the system thinks it is still unloading.
If you experience this issue, please follow this workaround:
Quoting from https://stackoverflow.com/a/20565337
There may be several causes which lead to the service being stuck in “marked for deletion”.
SysInternals’ Process Explorer is opened. Closing it should lead to automatic removal of the service.
Microsoft Management Console (MMC) is opened. To ensure all instances are closed, run
taskkill /F /IM mmc.exe.Services console is opened. This is the same as the previous point, since Services console is hosted by MMC.
Event Viewer is opened. Again, this is the same as the third point.
The key HKEY_LOCAL_MACHINE\SYSTEM\CurrentControlSet\Services\{service name} exists.
Someone else is logged into the server and has one of the previously mentioned applications opened.
An instance of Visual Studio used to debug the service is open.
What changes does Portmaster make to my system?
Most Important
- Portmaster does not do any permanent changes to your network configuration:
- No network interfaces are added or changed.
- No routing entries are added or changed.
- No DNS server configuration is added or changed.
- Required integration is done “on-the-fly” by redirecting packets.
- When Portmaster is shut down or uninstalled, all (volatile) network integration is removed automatically.
- When you still experience issues, check out #699.
Besides that, changes vary depending on your operating system:
Windows
- All data is saved to
C:\ProgramData\Safing\Portmasterby default. - A system service is registered and marked to start automatically at boot.
- Application entry for the Portmaster UI is added.
- Application entry for the Portmaster Tray Notifiier is added and marked to start automatically at login.
- Uninstall information is placed in the registry.
- Read more at Docs: Install on Windows
Linux
- All data is saved to
/opt/safing/portmasterby default. - Portmaster adds iptables entries on start and removes them when stopped.
- This integration makes use of packet and connection marks, which likely makes Portmaster incompatible with other software attempting the same.
- A systemd service file is placed at
/etc/systemd/system/portmaster.service. .desktopfiles are placed in/usr/share/applications/.- Icon is placed in
/usr/share/pixmaps/. - Read more at Docs: Install on Linux
Why is my Internet or Network Access broken after shutdown or uninstall?
While Portmaster integrates deeply into the network stack of your operating system, all of it is volatile - meaning that it is automatically removed when Portmaster shuts down or when Portmaster is uninstalled.
However, there are special cases where you might loose Internet or network connectivity after shutting down or uninstalling Portmaster.
1. DNS Configuration Issues
Portmaster becomes the gateway for all DNS queries when you install it, but it does not configure itself as your DNS server in the system. Rather, it does a soft integration by redirecting all DNS queries to itself.
What can happen is that at some point - while Portmaster is installed - the DNS configuration of your system is changed or corrupted into a state that does not work. But because Portmaster is installed, it will seamlessly fix it for you, because it “corrects” all queries. When you then shutdown or uninstall Portmaster this “fix” is removed and you end up with a broken DNS configuration.
Please review the DNS configuration of your system. When in doubt, set it to automatic or DHCP.
2. Network Stack Issues by the Operation System
In some more extreme cases, the system might not correctly remove the integration as it should.
Windows
Portmaster marks all its network stack integrations (the Firewall Driver / Kernel Extension) as non-permanent and as such they are removed by Windows when the Portmaster shuts down or when Windows reboots.
In rare cases, however, Windows fails to correctly remove Portmaster’s network stack integration correctly, resulting in a loss of network connectivity. We have never experienced this issue ourselves and thus haven’t yet been able to take an in-depth look.
The help Windows restore network connectivity, open a Windows cmd as an Administrator and enter the following commands to reset your network. Warning: You might need to reconfigure any special network settings you had.
netsh int ip reset
netsh winsock reset catalog
After that, reboot.
If these steps did not restore network connectivity, please report this.
Linux
Portmaster adds rules to the iptables configuration in order to integrate into the network stack. These are automatically removed when Portmaster shuts down or is uninstalled. There might be rare cases, where this does not happen. Then you can remove them manually by running sudo /opt/safing/portmaster recover-iptables or restarting.
If there is another problem, you can try to restart the networking with the command sudo systemctl restart networking or the equivalent for your distribution.
If these steps did not restore network connectivity, please report this.
Can I run Portmaster on a server?
Portmaster is currently built for desktops that have a physical graphical interface. That said, you can run Portmaster on a server if done correctly.
Backup Access
If in any way possible make sure and test your backup access to the server in case you lock yourself out.
Prepare Config File
We’ll need to write our config file ourselves and place it on the server before we install Portmaster so that we don’t lock ourselves out. You can either use an existing Portmaster instance to configure your settings and then copy the config.json file from the data directory, or you can build it from scratch. Below is a template as a starting point. Now, let’s go though the settings you want to change:
- API Listen Address
- By default, Portmaster only listens on localhost, change this to
0.0.0.0:817to enable connections from anywhere.
- By default, Portmaster only listens on localhost, change this to
- Incoming Rules
- You need to additionally allow from where connections to the Portmaster API are allowed. Scope this a narrow as possible.
- We can’t configure rules for applications in
config.json, so we add only global rules for now and can switch to per-app after install.- (First add app rule, test, and then remove the global rule!)
- Also, allow other management protocols so you can still access your server, such as SSH or RDP.
- Development Mode
- ⚠️ While Portmaster has support for API Keys, these are not yet supported for logging into the UI. This means you will need to activate Development Mode for now, to allow access the the UI.
- Automatic Updates
- Portmaster uses automatic updates to stay up to date. Depending on your use case, this might not be what you want.
- We haven’t yet split the automatic update system into binaries and intelligence data, so disabling this will cut you off from intelligence data updates.
- Until we have support for splitting this, you should manually update regularly by pressing the “Download Updates” button in tools menu.
If you run Portmaster on a private network you have access to, then this might be enough. If you want to access Portmaster via a public network, more caution and work is needed.
⚠️ Portmaster does not support HTTPS for the UI. You will need to take care of this yourself. We recommend using something like Traefik or Caddy as a reverse proxy for automatic HTTPS.
config.json template with multiple options - delete the ones you don’t need:
{
  "core": {
    "automaticUpdates": false,
    "devMode": true,
    "expertiseLevel": "developer",
    "listenAddress": "0.0.0.0:817"
  },
  "filter": {
    "serviceEndpoints": [
      "+ Localhost",
      "+ * TCP/SSH # Allow remote SSH access from anywhere",
      "+ * */3389 # Allow remote RDP access from anywhere",
      "+ * TCP/817 # Allow remote access to Portmaster from anywhere",
      "+ LAN TCP/817 # Allow remote access to Portmaster from LAN only"
    ]
  }
}
You may also want to validate the json before using your config.
Place Config File
Before installing we need to place to config file:
- Windows:
C:\ProgramData\Safing\Portmaster\config.json - Linux:
/opt/safing/portmaster/config.json
Install Portmaster
Then, run the installer for Portmaster on the server. If everything went well, then you should still have access to your server and to the Portmaster UI in the way you configured.
Does Portmaster support IPv6?
Portmaster has full IPv6 support.
Using IPv6 only
If you plan to use only IPv6 without IPv4, you’ll need to configure IPv6 DNS Servers with the DNS Configuration Guide.
Disabling IPv6
- Windows
- Disabling IPv6 on the system is currently not supported on Windows, as the Portmaster Kernel Driver will try to interact with the IPv6 network stack.
- You can block all IPv6 connections instead.
- Linux
- You can disable IPv6 in the network stack and restart Portmaster.
- If Portmaster detects no IPv6 addresses at all, it will disable IPv6 integration.
- Careful: DO NOT enable IPv6 again without also restarting Portmaster! You will NOT be protected!
Block all IPv6
In order to block all IPv6 connections, just add Block ::/0 to both Outgoing Rules and Incoming Rules.
How do I make my VPN or other software compatible with Portmaster?
Portmaster deeply integrations into the network stack of your operating system in order to protect your privacy. Sometimes this can lead to problems with other software, especially VPNs.
In addition to this guide, we also maintain a list of compatible VPNs and other software that you can check. Some also have dedicated instructions to get them to work.
Not every VPN or software will be able to work with Portmaster. See the Limits section below for details on this.
Allow Connections
First, find the VPN software in the Network Monitor in the Portmaster App and make sure all connections it makes are allowed. If you get it working, you can still block connections again to see if it can work without them.
If you don’t know how to allow blocked connections, please follow this guide: https://github.com/safing/portmaster/issues/706
Before you continue, please check if your VPN or software works now. Only continue, if it does not.
Disable Seamless DNS Integration
Portmaster takes great care not to break your system and as such does not make permanent changes to the network stack of your system: https://github.com/safing/portmaster/issues/702
Rather, in order to still seamlessly integrate, Portmaster redirects connections - mostly DNS queries - where they need to go. This can interfere with VPNs or other software that tries to do the same.
If you can disable your VPN’s behavior of this, then this is recommended. If that is not possible, you can disable Seamless DNS Integration in Portmaster. To do this, you have to:
- enter the Development Interface through the UI Mode in the settings
- set your Feature Stability to “Experimental”
Should I use an Anti-Virus together with Portmaster?
Speaking in general, Portmaster is a privacy tool, focusing on privacy features like DNS encryption or blocking tracking requests.
Anti-Virus systems, such as Windows Defender Firewall, on the other hand are security tools. As such, they focus on security features like malware detection, which Portmaster simply does not have.
Please note the important difference:
Anti-virus systems sometimes also _do privacy_, but they _focus on security_.
While Portmaster also _does security_, as privacy _depends_ on security, it _focuses on privacy_.
That is why we do not recommend deactivating Anti-Virus systems. We recommend having both have a security and privacy setup. Without security your perceived privacy can quickly become non-existent.
However, research if the Anti-Virus you are using is really as good as it claims. Many security researchers have come out in the recent years, declaring that Windows Defender Firewall is good enough for most use cases and quite some other Anti-Virus systems are doing weird stuff.
Where is the tray icon / app indicator in GNOME?
GNOME 3.26 removed the default tray icon support.
You’ll need to install an extension that adds support for status / app indicators. We recommend this one maintained by Ubuntu / Canonical Ltd.:
- Repo: https://github.com/ubuntu/gnome-shell-extension-appindicator
- Extension Page: https://extensions.gnome.org/extension/615/appindicator-support/
Why don’t I see any notifications / prompts in my OS?
Portmaster uses a separate component for integration with the notification system of your OS. This is handled by the Notifier, a part of Portmaster that lives in the system or notification tray.
- Check if you can see the Portmaster Icon with the colored status dot in your system tray. If you don’t see it, try starting the Portmaster User Interface.
- Check if Desktop Notifications and Prompt Desktop Notifications are enabled in Portmaster.
- Check if Notifications are suppressed by your OS.
- Windows: If you have “Focus Assist” set to “Priority Only”, you need to specifically allow Portmaster to show notifications.
Why does Portmaster send plain/unencrypted DNS queries?
Portmaster takes care of protecting your DNS queries by becoming the gateway for all DNS queries on your system and then sending them through an encrypted connection to the configured DNS server.
If you are using a DNS server for your network that has a dashboard, or if the DNS service you are using discerns between encrypted and non-encrypted queries, you might notice that sometimes Portmaster sends unencrypted queries.
In order to understand why that is necessary, let’s take a look at a common network structure: A free WiFi access point in a café or airport. Usually these can only be used when you accept their Terms of Service. In order for you to get you to read them, the network needs to somehow redirect to that. This needs to work even if the secure DNS server are unreachable - as you’ve not yet “logged into” the free network.
This is why Portmaster always sends a handful of special domains - used by operating systems and browsers - as plain DNS queries to the DNS server provided by the network. You can find the current list of these domains in the docs or in the source code as “Connectivity Domains”).
If you don’t want these queries to go out, you can block them by enabling the setting Ignore System/Network Servers or Use Secure Protocols Only. Please consider the side effects of enabling these settings when you do so.
The Portmaster will also attempt to detect these “Captive Portals” and will notify you if it finds one.
Why does the DNS Leak test say that I have a leak?
Leaks test are always built for a specific service. If a leak test says you are “leaking”, it means that your device is not configured exactly as they expect. If you are using Portmaster, this is most probably the case.
The easiest thing you can do is to take the IP addresses the leak test says you are leaking and enter them on this page: https://bgpview.io/
This will tell you who the IP address belongs to. As long as this is not your ISP, all is good.
Sometimes you can even try to just enter the IP address in your browser and see where it leads to. Many services have small web pages set up so interested network administrators can check what the IP address is used for.
If you are confident that you are experiencing a real leak of any kind, please report it and include the following information:
- The software or website you used for the test
- Any leaked IP addresses (that are not yours)
- Any leaked domain names / dns queries
How can I uninstall Portmaster?
If you are uninstalling Portmaster because something did not work or did not meet your expectations, please reach out and give us feedback!
Windows
Open the “Add or Remove Programs” app, find Portmaster and press “Uninstall”.
Alternatively, you can find the uninstaller at C:\ProgramData\Safing\Portmaster\portmaster-uninstaller.exe.
Linux
On most systems, you can open your graphical package manager, search for “Portmaster” and then have it removed.
Depending on your distro, this might leave your configuration intact, so if you want to fully remove everything, be sure to delete the data folder after uninstalling with sudo rm -r /opt/safing/portmaster.
If you installer Portmaster with the curl | bash script, you can also uninstall using it:
# Leave configuration data intact:
curl -fsSL https://updates.safing.io/latest/linux_all/packages/install.sh | sudo bash -s -- --uninstall

# Also delete configuration data:
curl -fsSL https://updates.safing.io/latest/linux_all/packages/install.sh | sudo bash -s -- --uninstall --purge
Notifications not available on Windows 7 and 8
We use the notification system that was added in Windows 10, as it supports actions (ie. has buttons). Windows 7 and 8 do not have any support for these buttons.
Notifications may still work to some extent, but prompts will not. Please disable Prompt Desktop Notifications.
Portmaster Core Does Not Start at Boot
Some users report that the Portmaster Core Service will not start at boot, although it is configured to do so. If that is the case, you can check its status in the “Services” Desktop App. There, search for the Service “Portmaster Core” and inspect and start it as needed.
Portmaster Fails to Restart
In some cases the Portmaster will fail to restart, because the Portmaster Kernel Extensions cannot be loaded and returns the error code 0x422.
This stems from a known issue in Windows, where system services are not completely removed when something is monitoring the system services.
When the Portmaster restarts, it is then unable to initialize the Kernel Extension, because the system thinks it is still unloading.
If you experience this issue, please follow this workaround:
Quoting from https://stackoverflow.com/a/20565337
There may be several causes which lead to the service being stuck in “marked for deletion”.
SysInternals’ Process Explorer is opened. Closing it should lead to automatic removal of the service.
Microsoft Management Console (MMC) is opened. To ensure all instances are closed, run
taskkill /F /IM mmc.exe.Services console is opened. This is the same as the previous point, since Services console is hosted by MMC.
Event Viewer is opened. Again, this is the same as the third point.
The key HKEY_LOCAL_MACHINE\SYSTEM\CurrentControlSet\Services\{service name} exists.
Someone else is logged into the server and has one of the previously mentioned applications opened.
An instance of Visual Studio used to debug the service is open.
Why is my Internet or Network Access broken after shutdown or uninstall?
While Portmaster integrates deeply into the network stack of your operating system, all of it is volatile - meaning that it is automatically removed when Portmaster shuts down or when Portmaster is uninstalled.
However, there are special cases where you might loose Internet or network connectivity after shutting down or uninstalling Portmaster.
1. DNS Configuration Issues
Portmaster becomes the gateway for all DNS queries when you install it, but it does not configure itself as your DNS server in the system. Rather, it does a soft integration by redirecting all DNS queries to itself.
What can happen is that at some point - while Portmaster is installed - the DNS configuration of your system is changed or corrupted into a state that does not work. But because Portmaster is installed, it will seamlessly fix it for you, because it “corrects” all queries. When you then shutdown or uninstall Portmaster this “fix” is removed and you end up with a broken DNS configuration.
Please review the DNS configuration of your system. When in doubt, set it to automatic or DHCP.
2. Network Stack Issues by the Operation System
In some more extreme cases, the system might not correctly remove the integration as it should.
Windows
Portmaster marks all its network stack integrations (the Firewall Driver / Kernel Extension) as non-permanent and as such they are removed by Windows when the Portmaster shuts down or when Windows reboots.
In rare cases, however, Windows fails to correctly remove Portmaster’s network stack integration correctly, resulting in a loss of network connectivity. We have never experienced this issue ourselves and thus haven’t yet been able to take an in-depth look.
The help Windows restore network connectivity, open a Windows cmd as an Administrator and enter the following commands to reset your network. Warning: You might need to reconfigure any special network settings you had.
netsh int ip reset
netsh winsock reset catalog
After that, reboot.
If these steps did not restore network connectivity, please report this.
Linux
Portmaster adds rules to the iptables configuration in order to integrate into the network stack. These are automatically removed when Portmaster shuts down or is uninstalled. There might be rare cases, where this does not happen. Then you can remove them manually by running sudo /opt/safing/portmaster recover-iptables or restarting.
If there is another problem, you can try to restart the networking with the command sudo systemctl restart networking or the equivalent for your distribution.
If these steps did not restore network connectivity, please report this.
How can I uninstall Portmaster?
If you are uninstalling Portmaster because something did not work or did not meet your expectations, please reach out and give us feedback!
Windows
Open the “Add or Remove Programs” app, find Portmaster and press “Uninstall”.
Alternatively, you can find the uninstaller at C:\ProgramData\Safing\Portmaster\portmaster-uninstaller.exe.
Linux
On most systems, you can open your graphical package manager, search for “Portmaster” and then have it removed.
Depending on your distro, this might leave your configuration intact, so if you want to fully remove everything, be sure to delete the data folder after uninstalling with sudo rm -r /opt/safing/portmaster.
If you installer Portmaster with the curl | bash script, you can also uninstall using it:
# Leave configuration data intact:
curl -fsSL https://updates.safing.io/latest/linux_all/packages/install.sh | sudo bash -s -- --uninstall

# Also delete configuration data:
curl -fsSL https://updates.safing.io/latest/linux_all/packages/install.sh | sudo bash -s -- --uninstall --purge
Why is my Internet or Network Access broken after shutdown or uninstall?
While Portmaster integrates deeply into the network stack of your operating system, all of it is volatile - meaning that it is automatically removed when Portmaster shuts down or when Portmaster is uninstalled.
However, there are special cases where you might loose Internet or network connectivity after shutting down or uninstalling Portmaster.
1. DNS Configuration Issues
Portmaster becomes the gateway for all DNS queries when you install it, but it does not configure itself as your DNS server in the system. Rather, it does a soft integration by redirecting all DNS queries to itself.
What can happen is that at some point - while Portmaster is installed - the DNS configuration of your system is changed or corrupted into a state that does not work. But because Portmaster is installed, it will seamlessly fix it for you, because it “corrects” all queries. When you then shutdown or uninstall Portmaster this “fix” is removed and you end up with a broken DNS configuration.
Please review the DNS configuration of your system. When in doubt, set it to automatic or DHCP.
2. Network Stack Issues by the Operation System
In some more extreme cases, the system might not correctly remove the integration as it should.
Windows
Portmaster marks all its network stack integrations (the Firewall Driver / Kernel Extension) as non-permanent and as such they are removed by Windows when the Portmaster shuts down or when Windows reboots.
In rare cases, however, Windows fails to correctly remove Portmaster’s network stack integration correctly, resulting in a loss of network connectivity. We have never experienced this issue ourselves and thus haven’t yet been able to take an in-depth look.
The help Windows restore network connectivity, open a Windows cmd as an Administrator and enter the following commands to reset your network. Warning: You might need to reconfigure any special network settings you had.
netsh int ip reset
netsh winsock reset catalog
After that, reboot.
If these steps did not restore network connectivity, please report this.
Linux
Portmaster adds rules to the iptables configuration in order to integrate into the network stack. These are automatically removed when Portmaster shuts down or is uninstalled. There might be rare cases, where this does not happen. Then you can remove them manually by running sudo /opt/safing/portmaster recover-iptables or restarting.
If there is another problem, you can try to restart the networking with the command sudo systemctl restart networking or the equivalent for your distribution.
If these steps did not restore network connectivity, please report this.
How do Broadcast Notifications work?
Broadcast Notifications are messages broadcasted by the Portmaster Developers and Team to all Portmaster users. We use this to alert users of important updates, breaking feature changes, privacy related issues, among others.
All notifications are publicly added to the source file and then distributed to all Portmaster instances via our update system. Safing (the company behind Portmaster) learns nothing about the Portmaster instances themselves. No data is ever sent.
Rather, when your Portmaster downloads the newest broadcast notifications - alongside the filter list updates, for example - it checks if there are any broadcast notifications that were not shown yet and that match certain criteria. This way we can show notifications only to those who are affected by a situation and keep the noise low for all others. The matching is always done locally and the matching data is never sent anywhere.